Showing posts with label flat shapes. Show all posts

Tuesday, July 5, 2011

0

Stars 'n Stripes 2011

I know I said I'd do video...but I what can I say? I was catching up on The Bachelorette while I did these (it's my husband's fault I got hooked - he went out with the guys one Sat. night, and it was on, and I just kept watching...yeah. Annoying, I know. But I digress...).

Anyways...I used my favorite Seche Vite base/top coat, along with Sparkly Nails red striper, Avon's "Splendid Blue" and Pure Ice "Platinum". I really waffled with whether to use the stars or not, because if those little points don't get pushed into the polish pretty well and coated heavily with topcoat, they can be uncomfortable to work around. Dangerous even. In the end, it just didn't look right without them, as you can see.

I started with two coats of Pure Ice "Platinum", which isn't the right color white, it's too pearly. Pretty, but cheap polish - I'm tossing all of this stuff out, I think, as it bubbled on me too.

I topped that with diagonal stripes with a red striper brush courtesy of Sparkly Nails. They sent this to me quite a while ago, but the polish was still nice and thin, and applied very easily. I was actually very impressed by the quality after so much time has passed. Great red color too.


Then I applied Avon "Splendid Blue" diagonally across the stripes, covering about half the nail. I'll get a video of this technique eventually, but I start with a single line across the center of the nail, and work out to the edge from that. Two coats, to cover all the polish underneath.


I liked the way this looks, but I'm sure you can see why it needed stars or something...the blue is just too overwhelming otherwise. So a thick coat of top coat, then press the little stars in firmly, then two more good coats of top coat to seal.


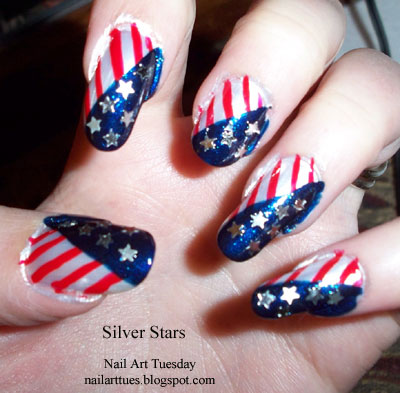
I cleaned up with an orange stick in the shower (the Pure Ice was hard to get off too), and clipped any errant star corners with a fingernail clipper to ensure the safety of myself and those I might brush against. And voila! A very patriotic manicure, I'd say.


I had a little tip pull - also the Pure Ice, I think, and my neglecting to wrap the polish around the edge.

Hope you had a fabulous holiday - until next week, Happy Polishing!

Tuesday, September 28, 2010

0

Purple Bows

Keeping up with the light-colors theme for my super-short nails...I like how this simple design turned out. And I love how easy it is to make precise designs with these stencils! I bought them from Nail Delights and plan on ordering more soon.
I started with two coats of Avon's "Luxe Lavender" polish over a layer of China Glaze base coat. I like this purple...the perfect pastel, I think.
I put one layer of China Glaze quick-dry top coat over to seal and dry everything quickly, and then started at my thumbnail. Remember when using these stencils to take most of the glue *off* by sticking them to the pads of your fingers a few times...it doesn't take much glue to keep them on the nail.
Then just stick some polish on the stencil - I used Sinful Colors "Daddy's Girl" for the bows...
And pull the stencil off before the polish sets. Voila! Sparkly purple bow.
I finished the rest one at a time - it goes really fast with virtually no work.
And then I finished it off with a little purple rhinestone in the center of each bow, and two coats top coat to seal.
You might notice my nails are cleaned up in this last photo - I've finally discovered a polish remover pen that works extremely well for me. Avon's Nail Corrector Pen is quick and easy with less wear & tear on my cuticles than my old shower method, and I'm ordering two more tonight. Something you may want to try if you're looking for a fast & easy way to clean up after a manicure. And no, I don't sell Avon (used to, but haven't for several years) or get anything from the company for this recommendation, I just really like the product. I'm seriously considering trying their cuticle oil pen too...

If you know me at all, you know I *love* Halloween. I even have a Halloween scrapbook blog. In any case, I'm declaring October "Halloween Month" here at Nail Art Tuesday...check back for the first Halloween manicure for this year next week.

Until then, happy polishing!

Tuesday, May 25, 2010

0

Disco Dust

Last week I decided (after much debate) that I was in the mood for purple. As you can see above, I rounded my tips back to my usual oval shape, and then started with a base of Seche Vite base coat, followed by *four* (yes, 4) coats of a miniature "Sally Girl" polish that seems to have lost it's name label. It's a beautifully shiny blue-purple color, but it's very sheer, so it took that many coats to make it nearly opaque. 
Then I coated it with one coat of another miniature Sally Girl called "Disco" - a sheer glitter that is super-sparkly. Unfortunately, none of my photos do it justice, but the one below without a flash sort of gives an idea. 
Then I embedded small iridescent plastic star shapes into the top coat - the glitter over the purple reminded me of star dust, so I figured stars would round it out nicely. Photo below again without a flash.
I sealed with another coat of Seche Vite, and cleaned up the sides. Unfortunately, this polish pulled away from the tips almost immediately, but I can't complain too loudly since it was super-cheap. It's pretty streaky too - I doubt I'll use it again. It was fun for the week though.
Last week I also got in a big order of new nail art supplies from Nail Art Delights! Adell was kind enough to include some freebies, including nail foil which I'm excited to play with. Here's a shot of my new goodies all spread out...fun stuff to look forward to!
I'm hoping to find or replace our camera tripod this week, so I can start posting some tutorial videos. Watch for those in a couple of weeks.

Meanwhile, inquiring minds want to know - what's on your tips this week?

Happy polishing...

Tuesday, March 16, 2010

0

Camoflauged Shamrocks

Green and shamrocks aboud on the nail blogs this week - St. Patrick's Day is coming! I've been planning to use Rimmel's "Camoflauge" for this - it's a 60 second drying polish, which I normally would never use due to wearability issues, but the color is just perfect for this holiday. My original thought was to freehand shamrocks in white, but I chickened out, and decided to use these little plastic hearts and gold boullion beads instead.
I started with two coats of Camoflauge - it doesn't dry in quite 60 seconds, but close enough. I'd forgotten how quick you have to move with the fast-dry polishes...a slight delay can cause definite brush marks.
Then I started with one tiny plastic metallic heart. I used a flash here so it would be clear, but the hearts don't really show red at all on my nails. They're more like the first (and last) photos.
Another heart to the side for the second leaf....
And a third heart to complete the shamrock. I did four on my index fingers for "lucky clovers".
I finished them off with four gold boullion beads for the stems, and two coats of my (bubbly) top coat.
Cleaned them up, and took a few finished photos without the flash. The first and last photos here are very true to color, at least from my perspective.
This manicure didn't take me long at all - an hour maybe, start to finish? And the metallic mirror finish on the hearts picks up on the green/gold polish, so what you see in that last photo is very true to how they look in both natural and "office" lighting. Very cool effect, I think.

Do you have shamrocks on your nails this week? Do share!